Check out that fire! If you look just to the right of the fire you will see my first Brooklyn apartment, the 3 windows on the 2nd floor. I don't think I ever ate at the Chinese restaurant, but there was a vent in the back that produced a greasy stench of old sesame noodles all the time, so I'm sure I absorbed some of that. Plus the Mr Softee truck would double park outside every day during the summer and play that damn song for 20 minutes while the driver waited for his order. I wonder what it looks like in that apartment now, it was pretty lousy when we lived there, and I wasn't proud of the state in which we left it. The mind reels at what kind of rent it commands now, it was $1300 in 2000. We shoved 3 people (and at times, 4) into this place; it is of note that none of these former roommates are in close contact anymore. But it helped me get my footing here (come to think of it, we rented it sight unseen, guess it coulda been worse).

I'm rather under the weather, but I still expect to finish much more of the basement this weekend. Aside from taping the seams in the ceiling, our biggest challenge will be moving the remaining 12 panels of sheetrock into the cellar. What fun that will be. Sheetrock has to be one of the most frustrating building materials ever devised by man. Most supplies are straightforward; plywood, 2×4's, nails. They are what they are. But drywall has some very odd properties.
It is de rigeur for the interiors of most houses, yet it's pretty delicate and can be damaged easily. It's heavy and unwieldy, but a screw can ravage it if it breaks through the outer paper layer. It's very dense but it can be cut and split using a boxcutter. I got some patching pieces to fit by literally filing down the sides, producing a horrendous amount of dust. When the drywall was delivered, many of the panels sustained damage (before Buzz and I even got our hands on it). There were strap indentations, some corners were crushed, some had paper torn off. Any little thing that happens to it can greatly reduce its structural integrity (Just try smashing a small part of a panel and see how easily the rest of it crumbles). But in theory it can all be made right again with a few dabs of joint compound, which, near as I can figure, is just a pail of liquefied drywall. What an amazing product.
Beyond the sheer weight of the panels, we had lots of pipes of varying importance to contend with. There are two big pipes for the radiator running through the room, as well as some gas lines and electrical conduits. But the real drag for me was just getting the screws to go into the metal hat channel.
Drywall is super easy to drill through, too easy in many cases, but the hat channel we were attaching it to was difficult to get started. Of course, once the screw has pierced the metal, it zipped into it, often too quickly to keep from ramming the screw all the way through the drywall, negating its effectiveness completely. I started predrilling holes to aid in this regard, and I ended up breaking two of them in the ceiling. I've gotta remember to get some higher-quality
drill bits.
Eventually, the screws went in and seem to be holding. There was a major foul-up on my part, as my painstaking calculations were rent asunder because for some reason I kept thinking the drywall panels were 4.5' instead of only 4'. Ugh, I kick myself every time I think of this. I don't know where I went astray but I screwed it up. We had to move one of the tracks in closer, leaving a significant gap on one side of the room. But I think we'll be able to work around this when we put up the walls. In soundproofing, you can't have the ceiling and wall touch, you're supposed to leave 1/4" and fill the gap with acoustical caulk. I am counting on my ability to make that work when we get to the point. But first we have to put another layer of sheetrock on the ceiling.
Yesterday I put joint compound and tape on all the seams. I didn't try to be neat since this layer will be completely covered by another layer of 5/8" drywall. I need to decide how to cut the sheetrock for this layer, I am thinking I should cut it into smaller pieces to make it easier to work with. I wish office drones got spring break like the college kids do, I could use some serious time off to work on this project. And of course, there aren't even any holidays between now and Memorial Day. That sucks!
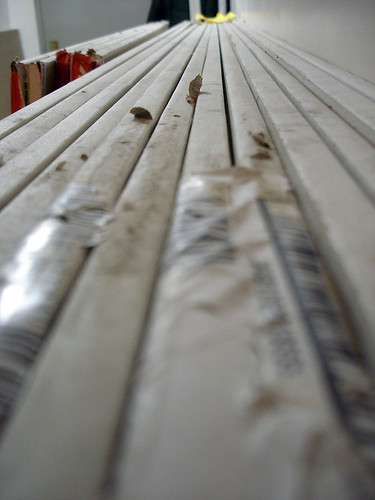
We tacked up all the fiberglass and started on placement of the metal furring hat channel. This is the narrow u-shaped track (whose profile resembles a hat sort of) that we attach to the joists (via Super Soundproofing Clips), from which drywall will hang. The trick was that we only had 30 sound clips for 5 rows of hat channel, which has to support two layers of 5/8" drywall. Oh, and there are 10 joists that span the room, which is 17' long. You do the math.
I ended using like quantum physics trying to figure out the best placement for each clip. This took hours. Then Buzz suggested that perhaps I was overthinking it a bit, so we took another look and started drilling in the clips. This took like a half hour. Now all that's left is the sheetrock. The 823 pounds of sheetrock …
We moved 22 panels of 5/8" 4'X8' Sheetrock, at around 90 pounds apiece. This means we moved nearly 2,000 pounds of gypsum. No wonder I was exhausted afterwards (not to mention I was hungover and on less than4 hours of sleep). Why are these projects always so much harder (and expensive) than you initially think? Even when you try to compensate in your mind, the reality is always much worse.
I have no idea how we're gonna get the drywall into the basement, I'll probably have to cut it first (oh boy, more dust!). Actually I should cut an 8-foot long slot in the floor and just slide the panels through to the cellar. Hey, it's my house dammit.
These metal/rubber things will hold the furring channels away from the ceiling joists so the new ceiling won't physically touch the frame of the house. This should keep things nicely separated, assuming I don't screw something up. The green stuff is padding tape, which I'm gonna put on everything I can until it runs out. This will further separate the new wall/ceiling layers from the existing framing. The stuff in the big tube is acoustical caulk sound sealant (made in my hometown of Mentor, Ohio!), which is just caulk that always stays flexible to absorb vibration. A few more pictures on Flickr. Maybe this will be of some use to somebody else out there, it seems hard to find actual photos of a lot of this stuff (as I said, the soundproof site is incredibly bad, much of the time if they have a picture at all, it's just an artist's rendition of what they think an item looks like).
I'm kind of worried about how we're going to get all the drywall sheets into the basement, some may need to be cut first. But that's pretty easy to do. I just hope the forecast is right (for once) as I don't' relish having to lug 22 4×8' 90-pound sheetrock panels through the rain. I feel very motivated to complete this project, not only so I can start playing the guitar again, but also so I can get back to dealing with the remaining orange parts of the house.
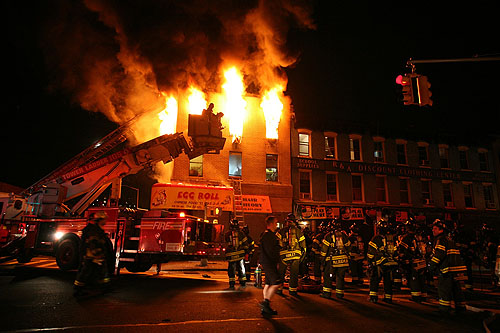 Burned Egg Roll, photo by Elizabeth Weinberg